
Hello, I’m gonna show you how to create a simple REST API in Rust. For that, we gonna use the Rocket framework for the API and Diesel ORM framework for persisting features.
This framework will cover all the things mentioned below. So it will be much easier than implementing from the stretch.
- Start a web server and open a PORT
- Listen to requests on this PORT
- If a request comes in, look at the Path in the HTTP header
- Route the request to the
handleraccording to the Path - Help you extract the information out of the request
- Pack the generated
data(created from you) and form aresponse - Send the
responseback to the sender
Installing Rust nightly
Cause Rocket makes abundant use of Rust’s syntax extensions and other advanced, unstable features, we have to install nightly.
rustup default nightly
If you prefer to install nightly only in your project directory. You can use the following.
rustup override set nightly
These are the dependencies are gonna used.
[dependencies]
rocket = "0.4.4"
rocket_codegen = "0.4.4"
diesel = { version = "1.4.0", features = ["postgres"] }
dotenv = "0.9.0"
r2d2-diesel = "1.0"
r2d2 = "0.8"
serde = "1.0"
serde_derive = "1.0"
serde_json = "1.0"
custom_derive ="0.1.7"
[dependencies.rocket_contrib]
version = "*"
default-features = false
features = ["json"]
Setting up diesel.
So the next thing um gonna do is setting up diesel. Diesel provides its own CLI.So we have to install it first. (assuming you are using PostgreSQL)
cargo install diesel_cli — no-default-features — features postgre
Then you need to tell what are your DB credentials to diesel. This command will generate a .env file.
echo DATABASE_URL=postgres://username:password@localhost:port/diesel_demo > .env
After that run this command.
diesel setup
This will create our database (if it didn’t already exist), and create an empty migrations directory that we can use to manage our schema (more on that later).
There might be several errors you may have when running the above code.
= note: LINK : fatal error LNK1181: cannot open input file ‘libpq.lib’
you can fix that easily by adding the PG lib folder path to environment variables.
setx PQ_LIB_DIR “[path to pg lib folder]”
I’m surprised why those errors are not mentioned in diesel docs. I highly recommend running these commands in cmd or Powershell. If you are using IDE’s terminal you won’t get any errors like this and you will end up wasting 2 hours trying to figure out what the heck is going on.

To fix that, you can add PG’s bin folder path to the Path variables. Problem solved? Good!
Let’s create a user table and create a migration for that:
diesel migration generate users
After running that command, you will see that there are two files generated inside the migration folder.
Next, we’ll write the SQL for migrations:
up.sql
CREATE TABLE users
(
id SERIAL PRIMARY KEY,
username VARCHAR NOT NULL,
password VARCHAR NOT NULL,
first_name VARCHAR NOT NULL
)
down.sql
DROP TABLE users
To apply our migration you can use:
diesel migration run
It’s good to make sure that down.sql is correct. You can quickly confirm that your down.sql rolls back your migration correctly by redoing the migration:
diesel migration redo
You can see that there’s a user table in your DB. Right!
I forgot to mention, if you’ve noticed, there’s a file that is generated after you run the Diesel setup named schema.rs. It should look like this.
table! {

users (id) {

id -> Int4,

username -> Varchar,

password -> Varchar,

first_name -> Varchar,

}

}
Cool, Here Comes the Rust Part
Since we are going to use the ORM, obviously we have to map the user table to something in Rust. In Java, we use Class to map tables. In Java, we usually call them Beans. In Rust, we use structs. Let’s create a struct.
use diesel;
use diesel::pg::PgConnection;
use diesel::prelude::*;
use super::schema::users;
use super::schema::users::dsl::users as all_users;// this is to get users from the database
#[derive(Serialize, Queryable)]
pub struct User {
pub id: i32,
pub username: String,
pub password: String,
pub first_name: String,
}
Now, you may wonder what these annotations are, like this above struct definition.
They are called derives. So, that line will derive serialize and queryable traits. #[derive(Serialize)] and #[derive(Deserialize)] are used to map data to response and request.
Now I’m going to create two more structs. You will get them later.
// decode request data
#[derive(Deserialize)]
pub struct UserData {
pub username: String,
}
// this is to insert users to database
#[derive(Serialize, Deserialize, Insertable)]
#[table_name = "users"]
pub struct NewUser {
pub username: String,
pub password: String,
pub first_name: String,
}
The next thing we are going to do is implement User. So it will have some methods to do database operations.
In here, as you can see, we have passed the connection to the method and returned a Vector of Users. We are getting all the rows in the user table and map them to the User struct.
Of course, we are expecting errors. The message “error” will be printed out if panicked.
impl User {
pub fn get_all_users(conn: &PgConnection) -> Vec<User> {
all_users
.order(users::id.desc())
.load::<User>(conn)
.expect("error!")
}
pub fn insert_user(user: NewUser, conn: &PgConnection) -> bool {
diesel::insert_into(users::table)
.values(&user)
.execute(conn)
.is_ok()
}
pub fn get_user_by_username(user: UserData, conn: &PgConnection) -> Vec<User> {
all_users
.filter(users::username.eq(user.username))
.load::<User>(conn)
.expect("error!")
}
}
Now we have created a table and structs to map that table. The next thing we are going to do is create methods to use it. So, we are going to create a routes file. We usually call it a handler.
use super::db::Conn as DbConn;
use rocket_contrib::json::Json;
use super::models::{User, NewUser};
use serde_json::Value;
use crate::models::UserData;
#[post("/users", format = "application/json")]
pub fn get_all(conn: DbConn) -> Json<Value> {
let users = User::get_all_users(&conn);
Json(json!({
"status": 200,
"result": users,
}))
}
#[post("/newUser", format = "application/json", data = "<new_user>")]
pub fn new_user(conn: DbConn, new_user: Json<NewUser>) -> Json<Value> {
Json(json!({
"status": User::insert_user(new_user.into_inner(), &conn),
"result": User::get_all_users(&conn).first(),
}))
}
#[post("/getUser", format = "application/json", data = "<user_data>")]
pub fn find_user(conn: DbConn, user_data: Json<UserData>) -> Json<Value> {
Json(json!({
"status": 200,
"result": User::get_user_by_username(user_data.into_inner(), &conn),
}))
}
Now, all we have to do is set up the connection pool. Here’s a brief explanation about the connection pool from the Rocket documentation.
“Rocket includes built-in, ORM-agnostic support for databases. In particular, Rocket provides a procedural macro that allows you to easily connect your Rocket application to databases through connection pools.
A database connection pool is a data structure that maintains active database connections for later use in the application.”
use diesel::pg::PgConnection;
use r2d2;
use r2d2_diesel::ConnectionManager;
use rocket::http::Status;
use rocket::request::{self, FromRequest};
use rocket::{Outcome, Request, State};
use std::ops::Deref;
pub type Pool = r2d2::Pool<ConnectionManager<PgConnection>>;
pub fn init_pool(db_url: String) -> Pool {
let manager = ConnectionManager::<PgConnection>::new(db_url);
r2d2::Pool::new(manager).expect("db pool failure")
}
pub struct Conn(pub r2d2::PooledConnection<ConnectionManager<PgConnection>>);
impl<'a, 'r> FromRequest<'a, 'r> for Conn {
type Error = ();
fn from_request(request: &'a Request<'r>) -> request::Outcome<Conn, ()> {
let pool = request.guard::<State<Pool>>()?;
match pool.get() {
Ok(conn) => Outcome::Success(Conn(conn)),
Err(_) => Outcome::Failure((Status::ServiceUnavailable, ())),
}
}
}
impl Deref for Conn {
type Target = PgConnection;
#[inline(always)]
fn deref(&self) -> &Self::Target {
&self.0
}
}
Finally, we need to start our server in the main file.
#![feature(plugin, const_fn, decl_macro, proc_macro_hygiene)]
#![allow(proc_macro_derive_resolution_fallback, unused_attributes)]
#[macro_use]
extern crate diesel;
extern crate dotenv;
extern crate r2d2;
extern crate r2d2_diesel;
#[macro_use]
extern crate rocket;
extern crate rocket_contrib;
#[macro_use]
extern crate serde_derive;
#[macro_use]
extern crate serde_json;
use dotenv::dotenv;
use std::env;
use routes::*;
use std::process::Command;
mod db;
mod models;
mod routes;
mod schema;
fn rocket() -> rocket::Rocket {
dotenv().ok();
let database_url = env::var("DATABASE_URL").expect("set DATABASE_URL");
let pool = db::init_pool(database_url);
rocket::ignite()
.manage(pool)
.mount(
"/api/v1/",
routes![get_all, new_user, find_user],
)
}
fn main() {
let _output = if cfg!(target_os = "windows") {
Command::new("cmd")
.args(&["/C", "cd ui && npm start"])
.spawn()
.expect("Failed to start UI Application")
} else {
Command::new("sh")
.arg("-c")
.arg("cd ui && npm start")
.spawn()
.expect("Failed to start UI Application")
};
rocket().launch();
}
Inside my project, I have added the Angular front end too. I’ll be using our Rust back end to serve it too.
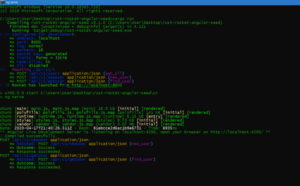
To run the application → cargo run.
7 kogus wrote on
John Doe wrote on
Asel wrote on